We know that images account for a lot of the internet:
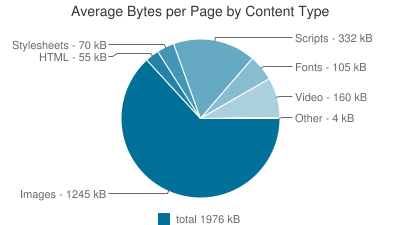
We know that speed is good, and that page weight is not good for speed. We also know that lossless image optimisation exists; that smart people have made it possible to get smaller images of the same perceivable quality at the cost of processing power.
Unfortunately, our standalone content (I have pure “Content Marketing” content in mind here) is often fragmented over a number of directories. Image compression tools, there are many, are often drag and drop affairs set to process single images and filetypes by default. This is not good if we’re trying to bake image optimisation into an organisation. When our images live in multiple folders withing a project, it’s disheartening for anyone to seek them out to process. This post aims to remedy that.
Why Optimise?
Image optimisation savings aren’t often going to be the biggest you could make (using the correct dimensions would be a start). However, reducing the filesize of your images doesn’t require any brainpower to perform. As a result, the cost/benefit trade-off puts it in the just do it category.
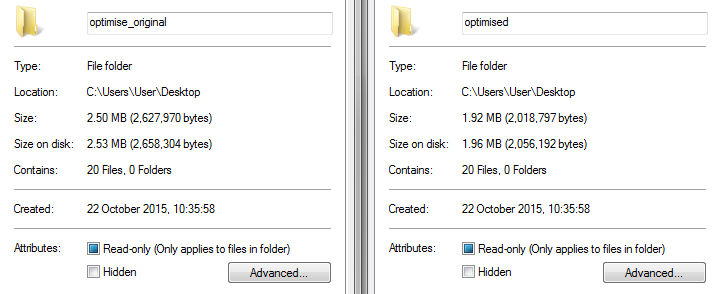
The tools presented in this article won’t be optimal, but it’s better to just get on with it to get into the habit of optimising your images. You can always switch to another method in future (though, squeezing a few additional percentage points out might not be worth the time investment to you).
If you’re dealing with a high traffic site, it probably will be. There isn’t a problem with chaining lossless tools together.
So, the following tools are from me looking for something comprehensive I could run just before pushing something live, without any brainpower required.
Image_optim
Image_optim is a ruby gem based on ImageOptim, the OSX utility (if you can, use it). As such, it is available cross-platform and easy enough to install and configure. Most importantly, it has a recursive flag, ‘-r’. If I’m being honest, I mostly favour image_optim because of this. To get started install the gem and binaries:
$ gem install image_optim image_optim_pack
I used a raspberry pi for this example (hopefully illustrating the default configuration isn’t resource heavy):
$ ~/Desktop image_optim -r --no-pngout --no-pngquant --no-svgo .
# Recursively optimise all images within Desktop in place.
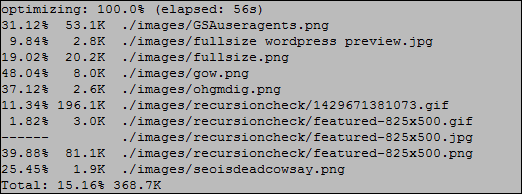
Running image_optim against 10 mixed format {png|gif|jpg} files on my desktop saw a 15% reduction in filesize.
By default, image_optim uses pngout, pngquant and svgo as part of it’s compression recipe. These are not installed by default. The exception flags used above will get you up and running if you don’t want to deal with installing the additional applications (instructions available on github). Fully configured, Image_optim will run:
Without any configuration, you’ll get all but three applied to your files. This is awesome in squeezing the filesize down.
Windows Image Optimisation
Image_optim isn’t for everyone. Ruby on Windows can be a little finicky, but thankfully there are plenty of alternatives available. For a recursive-by-default tool Brutaldev has packaged a shell script for Windows along with a number of tools for lossless image compression.
To use – download it. Run it. Enter the full URL path you want to optimise (copy+paste from the file explorer). Images will be run through the following tools:
- Gifsicle
- Jpegoptim
- Jpegtran
- OptiPNG
- PNGcrush
- PNGOUT
- DeflOpt
It’s not quite as comprehensive as Image_optim, but what matters is that you’re actually doing something to reduce unnecessary image weight.
What Next?
If you want to quickly test out this idea, download any complete webpage, run one of the tools on it, and view the resulting output:
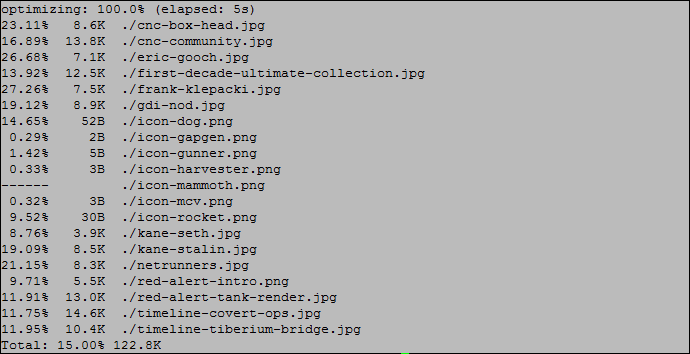
Think about how you could use something like this as part of development work. Your projects will be faster as a result.
If you aren’t a developer but work with them, they’re probably using something like grunt or gulp already. If you see savings from running a tool like this, you can gently encourage them to add an image optimiser to their automated process. There are plenty available for most task runners. Once they/you do this you can forget about it and bask in your ever so slightly faster projects.
Dragons
If you require meta-data to remain intact (e.g. for copyright reasons), then you actually do need to approach this area cautiously. It’s usually one of the first things to be stripped. Thankfully, this can be configured to remain, should you need it.
You also need to keep in mind that these methods are destructive in that they don’t preserve the original files. Make sure your version control is in order.
You might want to take a look at jpeg-recompress from jpeg-archive too – https://github.com/danielgtaylor/jpeg-archive – it automatically seeks the optimum compression level for each image by comparing different outputs to the original.
Combined with srcset etc you can get away with a lot of glossy images without wasting bandwidth or having those horrible jpeg artefacts
whoops sorry, didn’t see jpeg-recompress in the list for the ruby gem – please delete me :)